
Just the site, not in real life! I've gone and gotten myself a brand new, real-deal website where I will continue to blog just like I do here, but it will also be the home for my professional portfolio.
Come visit (and update your bookmarks and RSS feeds!):
AMYPALANJIAN.COM
It's still a bit of a work in progress as I transition content over and get everything retagged, but the blog will be up and running any day now!
You'll be redirected automatically in ten seconds...
Tuesday, October 18, 2011
Monday, October 17, 2011
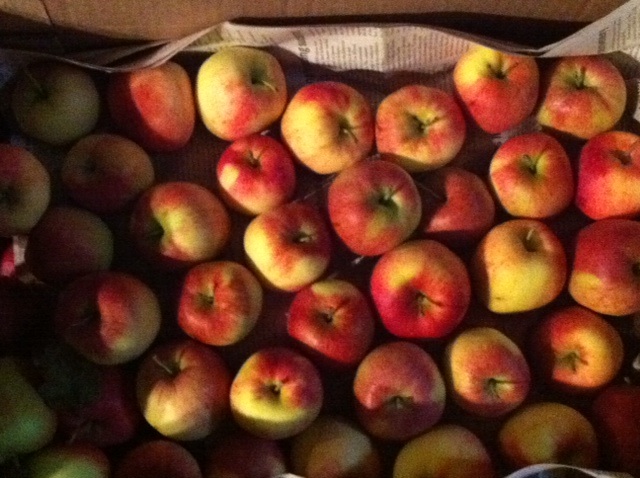
Easy DIY Apple Chips

When I was little, we ate a lot of dried apples. At one point we even got a dehydrator to make it easier (I'm pretty sure that was around the time there was an infomercial about them that played repeatedly...). We made all sorts of things for a period of time and it was so much fun to transform regular fruit into its dried version. I never realized that you could do the same thing with an oven—but with the piles of fruit that we have to use up since we don't really have great cold storage for that large of a quantity, I decided to give it a try.
What you see above are the results of my efforts: crunchy, flavorful, and deliciously sweet apple chips. They are 100% apples. I didn't add anything to them because I thought I'd start with the basics. All I did was to slice them thinly using my mandoline, then I placed them on parchment lined baking sheets in a 175 F oven for 4ish hours. If you check them earlier than that you'd get something closer to dried apples. One batch I made went as long as 6 hours and they were still delightfully crispy. (I saw a few recipes that called to leave them in for 10 hours, but that length of time seems unncessary).
I made two sandwich bags full and will probably try to make a few more while we have the apples because I have a feeling that we'll be eating these faster than we can make them!
Friday, October 14, 2011
Farm Anatomy by Julia Rothman: Blog Tour and Giveaway!

Today I'm delighted to be part of a blog tour for a new book, Farm Anatomy by Julia Rothman, that I absolutely adore. I've known of Julia's illustration work for years (she worked with us at ReadyMade) and I love the subject matter of this book, so in my mind that makes for a perfect combination. If you, like me, are interested in sustainable living and knowing where your food comes from—and yet haven't really spent much time on farms or around folks who really know farms—this book will make you happy. I'm pretty sure it would also make kids happy too.
You can WIN A FREE copy!
How to Enter:
To celebrate the release of the book, Storey Publishing is kindly offering to giveaway a copy of the book to one lucky reader. To enter, post a comment by 8 am central time Monday October 17 saying why you love farms. Or animals. Or tractors. Please use your email address to register so that I can contact you.
I'll choose a random winner and will announce it on Monday.
And now, Julia was kind enough to do a little Q&A so that we could learn more about the making of the book.
Where did the idea for the book come from?
My husband Matt grew up on a farm in Iowa and I grew up in the Bronx in New York. I never experienced farm life and so I've always been intrigued by his childhood. I had already worked with Storey publishing on illustrating some cookbooks and when they approached me to work together again, we came up with the idea of making an illustrated book all about everything farm related. I was excited to get a chance to really learn all about the tools, animals and food my husband grew up with and to have his family farm be the inspiration. The first illustrated spread shows his farm and all the buildings on it. I also grew up looking at the book Living on the Earth which my mother treasured. My idea for hand writing the text definitely came from appreciating those pages.

What was your favorite part of putting it together?
Definitely the drawing part. I love drawing lots of objects so doing the old-fashioned kitchen tools spread, the toolshed spread and all of the vegetable varieties was so much fun. There are 224 pages of drawings in this book, so while I was working on it, there wasn't a moment I wasn't drawing. I carried my sketchbook and research images everywhere I went and drew while watching television, in subway stations and airports, or while hanging out with friends. I remember I drew the barn cuploas page when I was at jury duty because some guy started asking me about it. It was probably the least inspirational place to be drawing something from picturesque farm life...

Was the topic something that you've been interested in for a while?
Before I met Matt, I don't think I really thought about it too much. My parents have friends who have a sheep farm in Maine and we visited them a bunch of times when I was a kid. I've always loved animals and my sister did as well. We grew up with all kinds of pets – from rabbits to parrots. My sister now studies primates in Uganda.

How did you do your research?
Most of my research came from other Storey publications. They have a huge range of books on every topic related to country living that you can think of. There are thick books just on timber frame construction and building chicken coops and raising goats and making maple syrup. It was hard to go through so much information and just pick out what I felt was important. While I merely skimmed the surface on all the topics, I tried to get a bit of general information on everything. Then I added some of the more curious tidbits in between. There was also visits to Matt's farm and advice from Matt's dad ("and you'll need to add water pumping windmills for sure...") and farmer's market shopping for the best looking vegetables to draw. After the book was totally sketched out, Storey had expert Carol Ekarius look everything over. She filled in some blanks for me and corrected anything that was out of order.

What do you hope readers learn or experience from the book?
I hope when they flip through it that it brings to mind the smell of animals or eating fresh apples or laying in hay or riding past endless fields. I want the book to evoke good memories of farm life. I also hope people learn something interesting from reading the text or try some of the recipes or projects.

How much time have you actually spent on farms? Just had to ask!
Not enough, that's for sure! I hope to continue learning and drawing about country life.
I hope to do more big projects like this book. Some sort of sequel would be fun : )
Thanks so much for sharing with us Julia. Here's the full blog tour schedule so that you can follow along for more chances to win books and to hear more about the project:
| 10/10 – MintDesign 10/12– Growing with Plants 10/14 – Things we Make 10/15 – Print and Pattern 10/17 – Small Measure 10/19 – SF Girl by the Bay 10/21 – Pikaland 10/23 – The Spunky Coconut 10/24- Pitch Design Union 10/25 – Reading my Tea Leaves 10/27 – Book By Its Cover 10/28– Design for Mankind |
Tuesday, October 11, 2011
Some of the Family Harvest Arrives in Iowa


And more apples. We haven't decided what to do with it all conclusively yet, but I'd like to try to make some dried fruit, along with (probably) more applesauce and perhaps some pear butter. I've also tossed out the idea of trying to can pie filling, which could be fun later in the cold months.
I am quite sure that I'll have many updates about the fruit as we put it to good use, but until then, I'm just feeling really grateful that all of this came from family—and that Josh made it home safely.
Friday, October 7, 2011
Almond Butter Dark Chocolate Rice Krispie Treats

I was wanting to make trail bars last weekend, but wasn't feeling quite up to shopping for the long ingredient list. So I dug out my battered copy of Cooking the Whole Foods Way by Christina Perillo, which I've had for years and years (and may have stolen from my sister a decade ago...oops, I just looked and it was even signed by Christina for my sis—sorry Katie!). It's one of those classic vegetarian and macrobiotic cookbooks that has recipes for desserts like kantee, in addition to an awesome assortment of nearly everything else you could be in the mood for. I remembered that there was a rice krispie esque treat in there that was rather simple and I decided to tweak it a bit to make it my own.
Almond Butter Dark Chocolate Rice Krispie Treats
Makes 12-16 squares depending on how large you cut themI actually store these in the fridge since I like them when they are slightly chilled.
1 1/4 cups brown rice syrup
1/2 cup almond butter3 cups crispy rice cereal
1 cup rolled oats (I used gluten free)
2 tablespoons unsweetened shredded coconut
1/2 cup dark chocolate chunks
Heat the brown rice syrup and almond butter in a small saucepan over low heat until creamy. Add the chocolate and stir until melted. Place the cereal and coconut in a bowl together and gently stir in the warm syrup mixture until well combined. Press into a shallow, square baking dish and allow to set until firm (put it into the fridge to speed things up if you'd like).
Day in My Life: Working in the Test Kitchen

Apologies for my absence around here this week. Our home internet has been out and I finally was able to get an appointment yesterday to have it fixed—squirrels had chewed through the exterior cable line! Hopefully they find something else to amuse themselves for a while...
Earlier this week I was able to spend two days working in the Better Homes and Gardens Test Kitchen as a way for me to see how they work. As part of my job as a food editor, I'm always sending down recipes for them to test and then attending taste panels to try the foods. I figured that it would be good for me to have a solid understanding of how they do their work, and also to see how taste panels for the different magazines vary, so I was entirely ready for my two days in the kitchen.

I made a cornflake crusted chicken (and learned the proper temperature to cook chicken to since Josh is in charge of the meat in our house) that was served with a fire roasted tomato sauce. The photo at the top of the post was my plated serving size, and my amateur attempts at food styling. Here is the table in the middle of the test kitchen where food goes after panel—so other folks can try dishes (and have snacks when they need one!).
My station was all set up for me when I came in in the morning, which I am pretty sure was special treatment.
I've decided that having one of these handy recipe holders in my home kitchen would be super helpful. I'd also like to figure out a way to bring their amazingly helpful assistants who take care of the dirty dishes home with me but that might take a little more effort!


I was pretty proud of my drizzling skills! All in all it was a great change of pace from sitting at a desk and I loved getting to know the culinary specialists, as they are known, better. I was trying to figure out a way that I could spend one day a week cooking (instead of doing my actual work) but I'm not sure that will fly with my boss...still, I realized that I have a pretty fun job, even if I stay on the side of just getting to taste the food.
Monday, October 3, 2011
Weekend Highlights: Digging Potatoes at Our CSA Farm


I made an apple pear pie, using apples from the farmers market and pears that we'd been gifted from a friend. It was the perfect way to spend a Saturday evening (though next time I won't forget the whipped cream!).
Friday, September 30, 2011
Photo Friday: Handstitched Vintage Block Quilt

I finished this quilt last weekend after just a few short weeks of working on the top. I think I've gotten faster at stitching with all of the wedding dress sewing! The top is made with vintage blocks, so this wasn't actually that much work since I didn't have to piece the top together. And, the best part is that we get to keep this one! It will live in our living room and keep us (me!) warm during the cooler months.
Stay tuned for better photos and a peek at my next quilting project—and have yourself an excellent weekend!
Tuesday, September 27, 2011
Story Behind the Craft: Wire and Resin Jewelry from Kukla Studio

Elitsa is a jewelry maker of Kukla Studio who works with silver and copper wire, resins, and enamel. Her work strikes me as being incredibly unique—each piece is so intricate and detailed that it nearly demands to be looked at more closely. Here, a bit more from Elitsa about her work, all of which you can see right here.
Where do you live?
I divide my time between Sofia, Bulgaria and Barcelona, Spain. Maybe at certain moment I'll decide on one city only, but for now I feel good changing every few months.

What sets your work apart?
What sets it apart is the use of the material and also the use of colors I guess. I also like to think my work is more sincere and not a cry to be too modern or extravagant, or too contemporary.

I find my inspiration everywhere—in the things I see around, in nature, in my dreams or sudden thoughts. Inspiration is not something to be easily track down but I think it's the combination of what you see, feel, and where you are in life.

How do you balance your creative work with the demands day to day life?
I am careful to always leave some time just to try things out and also some time to turn off and not to work for a while. I've found that this has always helped me. After some time off I'm always with new strengths to work and with new fresh ideas.
If you are a creative person and would like to share your work, email me to be considered.
Monday, September 26, 2011
Green Tomato Salsa

Green Tomato Salsa
Over the past week, Josh has made two batches of this since we had so many green tomatoes that just weren't getting ripe in our cool fall weather. We love salsa in our house and since it can be pricey, we figured that this could be a great use for all of that fruit—and boy were we right. This stuff is downright delicious, which is surprising since I never knew that you could do so much with green tomatoes. The original recipe is from Better Homes and Gardens, but we increased the spices to give it more flavor. If you are sensitive to heat, seed your peppers. (Also, feel free to fill your pot with green tomatoes if you have that many to put to good use—Josh did that and both of our batches yielded closer to 4 quarts!) We kept a jar in the kitchen after putting all of the others down into the basement for the winter and we've eaten this with chips and spooned on top of vegetarian chili so far. I can't wait to have it with scrambled eggs and with rice and beans.
Makes 5-6 pints
15 cups chopped green tomatoes
2-3 Anaheim or poblano chiles, chopped
2 jalepenos, chopped
2 large onions, chopped
1 cup chopped cilantro
1/2 cup fresh lime juice
1/2 cup white vinegar
5 garlic cloves, minced
1 tablespoon salt
2 tablespoons cumin
1 tablespoon pepper
1. Chop tomatoes, removing the core and seeds. Let drain in a colander for 30 minutes.
2. Transfer tomatoes to a large pot and bring to a boil, then reduce heat to a simmer. Let simmer, uncovered, for 1 to 1.5 hours, until your tomatoes are thickened (to a salsa-like consistency).
3. Add the remaining ingredients and simmer for 10 minutes.
4. Ladle salsa into hot, sterilized jars with 1/2 inch headspace. Wipe jar lids clean and tighten lids.
5. Process jars in a boiling water bath for 15 minutes (start timing with water is boiling). Remove from pot and place on wire racks to cool.
Friday, September 23, 2011
Photo Friday: Outtake from a Photo Shoot

Yesterday I had a photo shoot at work, which meant getting to look at pretty pictures of food all day and tweak and adjust until we got each shot just right. I've always loved shoots because they are a huge collaboration, I love seeing recipes and projects come to life in the hands of a stylist and a photographer, and it's a nice break from being at a desk.
But yesterday came with an even sweeter bonus: a barnyard puzzle! One of the food stylists made this over lunch for her grandkids. I find this to be completely adorable and I just have to assume that any kid would love to have this as an activity/snack. So sweet!
Wednesday, September 21, 2011


Tuesday, September 20, 2011
Guest Posting on Ktmade

Monday, September 19, 2011
End of Summer Vegetable Risotto with Tomatoes and Feta

Fall is definitely coming (ahem, here), but that doesn't mean that we're quite ready to transition to fall root vegetables and squashes. Despite the recent cold snap, we still have tomatoes and summer squash, which mean that there is still time to make this delicious risotto. The tomatoes are key here. They add a load of flavor (which means you don't have to add a load of butter). So use good fresh ones if you can get them, or experiment with a high quality canned version. Most of all, take the time to stand, stir, and enjoy the smells of the seasons changing.
P.S. I originally posted this on readymade.com last summer, but since the magazine was closed and this is one of my favorite all time recipes, I wanted to be sure to share it with you here. You're welcome!
End of Summer Vegetable Risotto with Tomatoes, Herbs and Feta
This is more a method than a specific recipe—it's highly variable based on the moisture content of the tomatoes—so my best advice is to stay close to the stove during the process and trust your instincts.
Serves 4-6
2 T olive oil
1 T butter
1/2 of an onion, diced
1 lb arborio rice
1/2 of a quart of chicken stock (this may vary- I had a quart box at the ready but only used about half)
3-4 big tomatoes, diced (this depends on the size and how juicy they are- I used three that were about softball sized)
2-3 cups summer squash or zucchini (depending on how much you like veggies)
2 T each fresh thyme and rosemary, finely chopped
1/2 c feta
2 T fresh basil leaves, finely chopped
Salt and pepper to taste
1. Warm the olive oil and butter over medium heat in a deep saute pan or a stock pot—I used a pasta pot since I knew I was adding lots of veggies and would need space. Add the diced onion and a dash of salt and stir to combine. When the onion is just starting to get translucent (about 2 minutes), add in your rice and stir to coat.
2. Add a few ladles of stock and half of your tomatoes, let cook until liquid is absorbed. Repeat, adding a bit of stock and more tomatoes stirring often, until you've added all of your tomatoes. As the tomatoes cook they will start to release their juices—stay close to make sure this happens before you hear sizzling...that is your cue to add a bit more stock. Keep stirring.
3. Add in your squash and stir frequently to keep your rice from sticking. (I know this seems laborious, but hang in there!) Watch as the veggies continue to cook, adding liquid as you need it (I didn't need the stock except in the beginning since the tomatoes I used were so juicy). When the rice starts to look done—the outside will turn a softer shade of white, which will spread to the entire grain as it cooks—start testing the rice by eating a piece. Keep testing every few minutes...and stirring.
4. When the rice is nearly done, but still a little firm in the middle, stir in the rosemary and thyme. Continue stirring very often as there is likely enough liquid to keep everything simmering, but not enough to prevent it from scorching if you walk away. Don't walk away!
5. When the rice is done (a little al dente, but mostly soft), stir in the basil, feta, and salt and pepper to taste. Turn the stove off, put the lid on the pot, and let it rest for about 10 minutes so that the flavors combine. Serve topped with Parmesan.
Friday, September 16, 2011
2012 Calendars from Leah Duncan

I've loved Leah Duncan's work for a while now and I have one of her tea towels (hung on a wall for fear of getting it dirty:) and a print in my house.

She just released her 2012 calendars and this 12 Month Calendar is a stunner.

I'm pretty sure that this will be coming to live with me in my home office.
Happiest weekend everyone!
Thursday, September 15, 2011
Story Behind the Craft: Whimsical Paintings from Andrea Doss

I'm so excited and thrilled by both the artwork and the story behind today's post that I'm just going to let the post speak (mostly for itself). Andrea's energy is infectious, so I hope that by hearing a bit about her life and what drives her creativity, you'll find a little more inspiration in your own day. If you have a story and a craft that you'd like to share, email me at thingswemake at gmail dot com!
Name: Andrea Doss
Where do you live?
Home of cattle drives, stockyards and bumper-to-bumper traffic, we call Fort Worth, Texas home. We love the unusual combination of country and city life that we get here. Where else can you walk out your door and see cow pastures on one side and the sky scraper city line on the other?
Is this your full time work?
Yes, painting is one of my full time jobs. Along with chasing my two-year-old around the house, home schooling my nine-year-old and folding the heaps of never ending laundry that somehow multiply when I'm not looking.

How did you learn to make this style of art?
I've been painting for years and I've tried all kinds of styles, from traditional realism to abstract modern. While I enjoy those styles and can appreciate their beauty, it was something I had to force. Then one day, my daughter wanted me to paint something for her. She helped me with the concept, gave me input on the colors and characters, and before I knew it, I had painted a mermaid. My daughter was more than thrilled and I realized that I really REALLY liked painting in that style. I haven't stopped since.
What sets your work apart?
Storytelling. Every painting has a little story to go with it (usually invented my daughters). The characters in my paintings are all in the middle of some kind of adventure or mischief.

Where do you find your inspiration?
I've been telling stories to my nieces and nephews, and now my daughters, for years. Painting is just an extension of that storytelling. I also get lots of inspiration from my nine-year-old. She has a very active imagination.
How do you make time for your creativity?
I get lots of help. When I'm painting, my girls are doing something crafty, too. My kitchen is filled with crayons, paper, glue and boxes of glitter and paint. I've pretty much given up on having a clean table.

After I finish a painting, they gather around to give it their personal, professional critique. This is the point where they inject story elements that I may not have thought of before. One time, after I finished a painting filled with barnyard animals, my two-year-old gave me the sternest look and demanded to know why there wasn't a hippo in the painting. A hippo? I knew I had forgotten something!

Did you start these after you had kids or before, and why?
Having kids changed my perspective on everything, including the way I view art. Kids look at art and they immediately love it. Or not. There's no analyzing, no trying to interpret deeper meaning, no intellectual debate about its symmetry. I would never have realized before my daughters entered my life how amazing it is to get a child's approval on something I created.
Click here to visit Andrea's shop which comes in a range of prices. Thanks so much for sharing!!
Wednesday, September 14, 2011
Word Less Wednesday: Early September (With a Few Words)

.


And of course he also canned more beets. He's been volunteering at our CSA farm and coming home with crates of them, so I'm delighted that he's putting them to good use.
(I thought I might mix up this Wordless Wednesday business by sharing a few words.)
Subscribe to:
Posts (Atom)


