Showing posts with label Food: Main Dish. Show all posts

Monday, September 19, 2011

End of Summer Vegetable Risotto with Tomatoes and Feta


Fall is definitely coming (ahem, here), but that doesn't mean that we're quite ready to transition to fall root vegetables and squashes. Despite the recent cold snap, we still have tomatoes and summer squash, which mean that there is still time to make this delicious risotto. The tomatoes are key here. They add a load of flavor (which means you don't have to add a load of butter). So use good fresh ones if you can get them, or experiment with a high quality canned version. Most of all, take the time to stand, stir, and enjoy the smells of the seasons changing.

P.S. I originally posted this on readymade.com last summer, but since the magazine was closed and this is one of my favorite all time recipes, I wanted to be sure to share it with you here. You're welcome!

End of Summer Vegetable Risotto with Tomatoes, Herbs and Feta
This is more a method than a specific recipe—it's highly variable based on the moisture content of the tomatoes—so my best advice is to stay close to the stove during the process and trust your instincts.
Serves 4-6

2 T olive oil
1 T butter
1/2 of an onion, diced
1 lb arborio rice
1/2 of a quart of chicken stock (this may vary- I had a quart box at the ready but only used about half)
3-4 big tomatoes, diced (this depends on the size and how juicy they are- I used three that were about softball sized)
2-3 cups summer squash or zucchini (depending on how much you like veggies)
2 T each fresh thyme and rosemary, finely chopped
1/2 c feta
2 T fresh basil leaves, finely chopped
Salt and pepper to taste


1. Warm the olive oil and butter over medium heat in a deep saute pan or a stock pot—I used a pasta pot since I knew I was adding lots of veggies and would need space. Add the diced onion and a dash of salt and stir to combine. When the onion is just starting to get translucent (about 2 minutes), add in your rice and stir to coat.
2. Add a few ladles of stock and half of your tomatoes, let cook until liquid is absorbed. Repeat, adding a bit of stock and more tomatoes stirring often, until you've added all of your tomatoes. As the tomatoes cook they will start to release their juices—stay close to make sure this happens before you hear sizzling...that is your cue to add a bit more stock. Keep stirring.
3. Add in your squash and stir frequently to keep your rice from sticking. (I know this seems laborious, but hang in there!) Watch as the veggies continue to cook, adding liquid as you need it (I didn't need the stock except in the beginning since the tomatoes I used were so juicy). When the rice starts to look done—the outside will turn a softer shade of white, which will spread to the entire grain as it cooks—start testing the rice by eating a piece. Keep testing every few minutes...and stirring.
4. When the rice is nearly done, but still a little firm in the middle, stir in the rosemary and thyme. Continue stirring very often as there is likely enough liquid to keep everything simmering, but not enough to prevent it from scorching if you walk away. Don't walk away!
5. When the rice is done (a little al dente, but mostly soft), stir in the basil, feta, and salt and pepper to taste. Turn the stove off, put the lid on the pot, and let it rest for about 10 minutes so that the flavors combine. Serve topped with Parmesan.
 

Tuesday, September 6, 2011

Fresh Tomato Salad with Roasted Vegetables


Fresh Tomato Salad with Roasted Vegetables
A few weeks ago I made this Fresh Tomato Sauce for bhg.com and over the weekend I was inspired to take it up a few notches by turning it into a stand alone salad. You do need to turn the oven on, but with the feeling-like-fall temperatures, that shouldn't be an issue. I recommend making this while you still have some delicious tomatoes on hand—and eating it on a porch with your feet up.
5-6 medium ripe tomatoes, chopped into chunks
1 large handful basil, chopped
1/2 medium red onion, thinly sliced
2 T olive oil
Salt and pepper to taste

Mix all ingredients together into a large bowl and let sit while you prep the roasted veggies. Preheat your oven to 400 F.

2 bell peppers, chopped into 1-inch pieces
1 eggplant, chopped into 1-inch pieces
3-4 small to medium potatoes, diced
Olive oil
Salt and pepper

1. Spray a foil-lined baking sheet (or two) with nonstick spray. Spread out your veggies and potatoes and sprinkle with olive oil, salt, and pepper. Roast until tender, about 20-30 minutes (though this will vary depending on your vegetables—check every 5 minutes after 20, shaking the pan to make sure things don't stick).
2. Remove from the oven when tender and let sit for 5 minutes to cool slightly.
3. Add the roasted vegetables and potatoes to the fresh tomatoes and stir to combine. Serve as is or with tahini sauce (particularly the kind from Trader Joe's).
4. Enjoy!

Monday, August 22, 2011

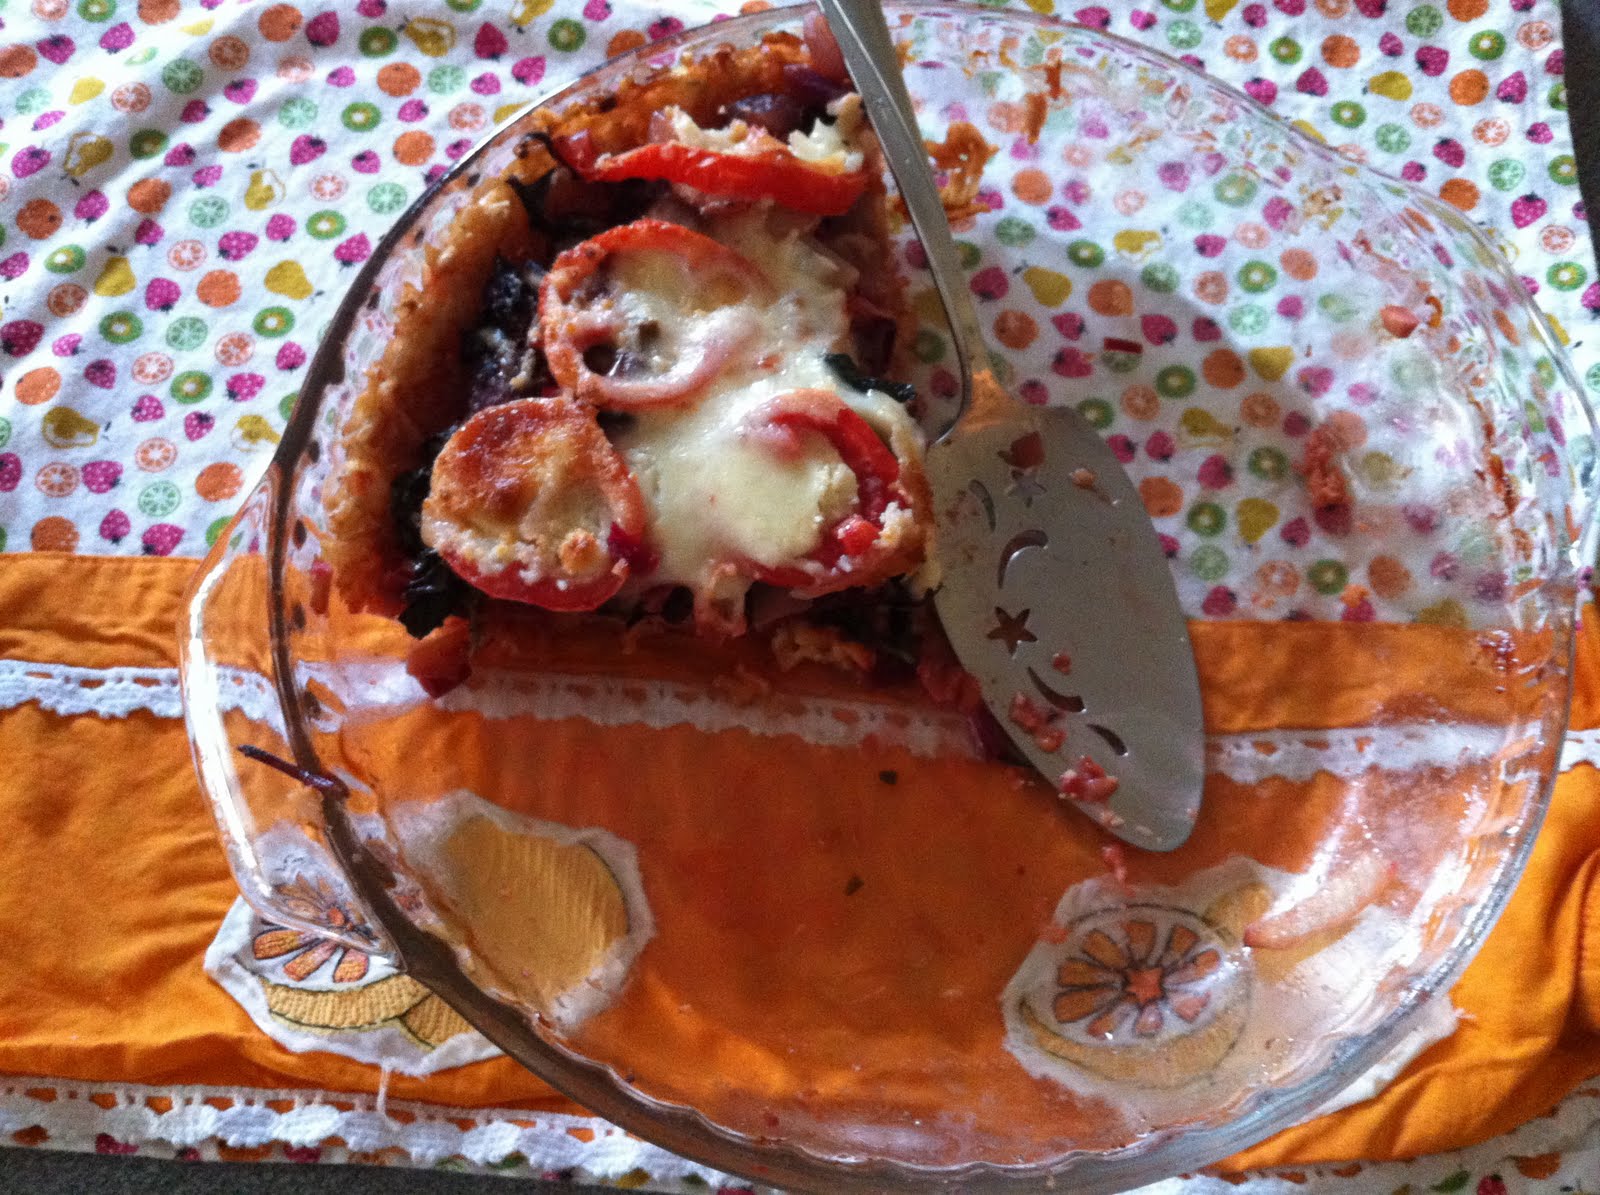
Cheesy Onion and Greens Pie with Brown Rice Crust

Casseroles are notoriously hard to photograph, so thank you for accepting this for what it is!
 At some point last week, I remembered this savory pie that my mom made repeatedly about ten years (or more) ago. It had a crunchy basmati rice crust and was filled with summer vegetables. I loved that rice pie and was so glad that my mom was able to spend some time searching for the recipe—which is this Roasted Vegetable-Cheese Pie. I couldn't wait to make it to see if it was as good as I remembered and, as someone who can't eat much gluten without getting a whopping headache, the rice crust was utterly intriguing—and potentially a much simpler way to make crusts than making a GF flour mix.

One of the things that has changed for me since I discovered my gluten intolerance is that I bake a whole lot less. I still make muffins and granola regularly because I've found super easy substitutes, but the sheer price difference between regular and GF flour is a little off putting. This gf flour mix is great, but lately I just haven't wanted to spend the money to buy the 5 different ingredients. Maybe this has something to do with it being summer (probably!), but I love an easier solution when I find one.

 Yesterday, I gave it a go. I used the exact recipe for the crust and improvised with the filling based on the vegetables that we had in the house—we had two bags of beet stems and greens to use up so in they went. Along with caramelized onions and a hefty load of garlic, my filling was complete.

 I topped the pie with sliced roma tomatoes and subbed in mozzarella (it was in the fridge!) for the Fontina that was called for in the recipe. I also added an extra sprinkling of Parmesan on top for an extra flavor boost.

 All in all, it was incredibly easy to put together and it was absolutely delicious. The flavors melded together and were earthy (from the beet greens) and slightly sweet (from the caramelized onions) and the slightly gooey cheese on top pulled it all together. It was a very lovely Sunday night dinner.  I could see making this with a filling of butternut squash, zucchini, or chard—and quite possibly adding in bacon or diced ham—and I am quite certain that I will be experimenting with this rice crust idea when the time rolls around to make pumpkin pie...

Cheesy Onion and Greens Pie with Brown Rice Crust
Adapted from Cooking Light

Cooking spray
2 cups basmati rice, cooked (I used brown basmati but white works too)
2 egg whites
1/4 cup Parmesan
1 T olive oil
3 onions, chopped
3-5 cloves of garlic, minced
4-5 cups hearty greens (I used beet greens and stems), sliced thinly
3 Roma tomatoes, or one medium tomato, thinly sliced
1/2 cup mozzarella
Parmesan cheese
Salt
Pepper

1. Preheat your oven to 400 F. Coat a pie plate with cooking spray.
2. Mix the first three ingredients in a bowl, incorporating well. Press into and up the sides of your pie plate and bake for 10 minutes.
3. Meanwhile, heat your oil in a large saute pan over medium and add your onions, stirring to coat. After about 5 minutes when the onions are just starting to soften, add salt, pepper, the garlic and the beet greens. Put a lid onto your pan and let cook until the greens start to wilt, giving it a stir every few minutes. You want the mixture to be soft and cooked. If at any point the veg are sticking to the pan, add a bit of water.
4. Reduce the oven temperature to 375 F. Sprinkle 1/4 cup of the cheese onto the bottom of the crust, then add your vegetable filling, spreading evenly. Add your tomato sliced, then the rest of the cheese, and a sprinkling of Parmesan. Bake for 30 minutes. After 20 minutes, check to see if the top is getting brown. If it is, put a sheet of foil on top for the last 10 minutes to prevent burning.
5. Remove from the oven and let sit for 10-15 minutes before serving.

Thursday, August 18, 2011

Lemony Brown Rice with Zucchini and Carrots


Lemony Brown Rice with Zucchini and Carrots
I whipped this up after work one night recently in an effort to put the lingering veggies in our fridge to good use, and to give the chicken that Josh was roasting some company.  It was so delicious that I will surely make it again. I served it with a bit of tahini sauce from Trader Joes, though it's extremely flavorful all on it's own—the sauce mostly adds a bigger hit of garlic. It makes an excellent side dish if you like to have a protein with your dinner (like Josh often does), or a fantastic vegetarian main dish (which is usually how I lean). You could also add a handful of walnuts, cooked white beans, or some feta if you want to up the non-meat protein. This rice dish is a nice reminder that whole grains can be extremely comforting, regardless of the season.

Serves about 4

2 cups brown rice blend (I love this one from Lundberg Jubilee Rice because it's so wonderfully nutty and flavorful though plain brown would be just fine)
3-4 medium carrots, grated
1-2 small squash, grated (I used pattypan since it's what we had, but zucchini or yellow squash would work)
3 garlic cloves, minced
1 tbsp olive oil
1 tbsp butter
salt
pepper
1 lemon, juiced

1. Cook your brown rice according to the package directions.
2. Meanwhile grate your vegetables.
3. Heat the oil over medium heat, add your vegetables, and stir to coat. Stir regularly as the mixture starts to cook, then add your garlic (I like to add it a bit later so that you can taste it more and you don't risk burning it).
4. Once the vegetables are just tender, stir in your rice, the butter, salt, pepper and the lemon juice. Turn off the burner, cover, and let sit for 5 minutes to let the flavors combine.

Thursday, March 18, 2010

Quick Weeknight Dinner: Broccoli Cheddar Soup

 
Even though I'm not Irish and I've never really felt the need to celebrate St. Patty's Day, the fact that there was a raucous parade outside of my office inspired me to at least cook one green item for dinner yesterday. I'd had my eye on this Broccoli Cheddar soup from 101cookbooks for a while now and not only was it a cinch to pull together (I even used a no-fuss bag of frozen broccoli!), but it was completely delicious and very flavorful. We added a mostly seeded jalepeno pepper for a bit of a kick and had it with some garlic bread and chicken cutlets. It's definitely going into regular rotation!

Friday, March 5, 2010

Photo Friday: It is a Day for Pizza


Growing up, Friday's meant pizza for dinner. It was a thing that many people in my town did—you picked up the phone and ordered from Riv and then went to pick it up, standing in line nodding and waving to people you knew. Riviera makes the best Sicilian pizza and does a bang up job with a regular slice, and I credit them with my deep down love for pizza. (Well them and my grandparents who fed me a lot of tomato pie!) I have learned that you can keep a batch of Artisan Bread in 5 min a Day in the fridge and pull off chunks to make dough, like Marc of No Recipes routinely does for lunch, and that even the simplest sauce of garlic sauteed in olive oil with half of a large can of diced tomatoes makes for an excellent topping. 

I have no solid plans to make pizza this weekend, but I'm doing my darndest to convince a friend to because I know that it's worth it, so I thought that I'd share a bit of food inspiration as we head into the weekend. I wish you all a happy and relaxing two days, hopefully with a glimpse of grass and warmer temperatures. Until Monday!

Image of Grilled Onion, Gruyere and Rosemary Pizza via No Recipes

Monday, November 30, 2009

Parmesan Sage Custard Tart with Squash and Carmelized Onions


I hope you all had a fantastic holiday and long weekend. I have a few posts this week that will catch you up on how I spent the days, and the first one is the dish I made for Thanksgiving.

When I was deciding between recipes of squash tarts, I tried to choose the easiest one, both in terms of method and ingredients. That didn't actually turn out to be the case as this took me about three hours to make on Wednesday night, but thankfully it was a lot of inactive time (while the dough chilled at various points and I did other things like bake muffins). And it turned out so well—the crisp crust with a hint of sage, the smooth texture of the filling—that I would completely make it again.

Here's the link to the recipe which tastes a bit like quiche, but the rich filling is actually only one egg with a relatively small amount of cream steeped with parmesan, baked over squash and onions (I used more than they called for since I so love caramelized onions).
As I said, this is not a fast recipe, but some of the people who left reviews of it used pre-made crust which is a great option.

Don't forget: today's the last day to enter the Tiffani Taylor art giveaway!

Monday, October 19, 2009

Weekend Project: Baked Squash Gnocchi

After picking up my last fall CSA share (don't be too sad, my winter share starts in two weeks!) I realized that I had to find some new things to do with squash (and potatoes and rutabagas...). I had six decent sized ones on my counter yesterday morning and was feeling pressured to start eating them. I'd originally been wanting to do a traditional Melfi (my Italian family name) Sunday dinner of meatballs and gravy, but it just felt wrong to go to the store for ingredients when I had a house full of food.
So I was extremely excited when I found this recipe for squash gnocchi from my Tuscan cooking school vacation. We made regular gnocchi when I was there, which were amazing, so I had faith that these would turn out well. Plus, I had the rest of the ingredients, it was super simple AND I got to use my new immersion blender again!

Paired with Brussel sprouts sauteed in butter, then tossed with toasted walnuts, it was a delicious dinner. The texture of the gnocchi was silky smooth and I loved that the combination of flavors was something entirely new.

Gnocchi di Zucca
2 lb pumpkin or butternut squash (mine was not butternut, it was long thin and striped yellow and green, though I do not know the variety!)
olive oil
2 onions
3 cloves garlic
1 large can crushed tomatoes (either with basil, or plain and then add a few basil leaves into it)
5 oz flour
3 oz parmesan cheese

Preheat the oven to 350.
1. Peel the squash, remove the seeds and cut into 1 inch cubes. Heat 2-3 tablespoons of olive oil over medium heat in a large skilet and sautee the squash. Add salt and pepper.
2. Meanwhile, dice the onion and mince the garlic. Add to the squash. Turn off the heat when everything is softened or is starting to brown.
3. Transfer the squash mixture to a large glass or ceramic bowl and use a hand blender to process (you could also do this in a food processor, though maybe let the mixture cool slightly first.)
4. Return the squash to the skillet, turn the heat on low, and stir in flour a little at a time until it is considerably thicker but still creamy.
5. Pour the tomatoes into a large shallow ovenproof dish. With 2 spoons, make walnut sized balls of squash and place in the sauce. Sprinkle with parmesan and bake for 15 minutes. Top with more cheese to serve, if desired.

Wednesday, October 7, 2009

Bean and Escarole Soup (Or Crostini)

It's now prime soup making season—which I'll be doing a lot of, especially since my sweet mom sent me an immersion blender and we're already hitting lows in the 30s here!—so I've been going through some of my favorite recipes for inspiration. The one shown here was one of my favorites from the cooking course I took in Italy last summer. I've posted a handful of the recipes from that week because they are simple, flavorful and on the whole, really comforting (I'm Italian American, so I'm programmed to love this sort of food!). With this one, I also particularly love the photo I snapped, which hangs on the wall in my kitchen. You can make this as a soup, or as a crostini. I've made it both ways and loved it each time.

Bean and Escarole Soup OR Crostini
from Organic Tuscany
Serves 4 as a soup starter, or makes 24 crostini

10 oz cooked cannellini or borlotti beans and the water they were cooked in
1 head escarole (or any curly bitter lettuce)
2 cloves garlic
2 small chilli peppers
Olive oil


1. Boil the lettuce in plenty of boiling, salted water. Squeeze the water out, and chop it finely.
2. Stir fry the garlic (whole) and the chilli peppers in a good swoosh of olive oil.
3. Add the cooked lettuce and cook for a little while, so that the lettuce takes on the flavors of the oil.
4. Add the cooked beans and 2 cups of the water they were cooked in. Cook on a low flame for 10-15 minutes.
5. Serve with warm bread or toast, rubbed with raw garlic.


Monday, September 28, 2009

Thai Pumpkin and Squash Soup

Even though it was still in the high 70s here all weekend, it's definitely feeling like fall and yesterday seemed like a perfect day for a pot of soup. (It also helped that Josh had two pumpkins and two squashes just asking to be put to good use!) We looked at a bunch of pumpkin recipes, trying to find one that didn't call for too many obscure ingredients and also that had spices we were interested in. I was excited that we settled on this one from 101cookbooks, though we omitted the pureeing because it just didn't seem necessary. It was so easy to put this together and the results were incredibly flavorful. I'll definitely be making this one again in the coming months.

Thai-spiced Pumpkin Soup
adapted from 101cookbooks.com
serves 6

2 acorn squash, pumpkins, or other smallish winter squash
3 tablespoons unsalted butter, room temperature
1 14-ounce can coconut milk
1-6 teaspoons (I used about 4) red Thai curry paste
water
2 teaspoons fine grain sea salt (or to taste)

1. Preheat the oven to 375 degrees and place the oven racks in the middle.
2. Carefully cut each squash/pumpkin into halves (or quarters). Slather each piece of squash with butter, sprinkle generously with salt, place on a baking sheet skin sides down, and place in the oven. Roast for about an hour or until the squash is tender throughout.
3. When the pumpkin/squash are cool enough to handle scoop it into a large pot over medium high heat. Add the coconut milk and curry paste and bring to a simmer. Gently smash the squash with a wooden spoon. Add water a cup at a time until the soup is the consistency you prefer. Bring up to a simmer again and add the salt (and more curry paste if you like).


Monday, April 13, 2009

Weekend Project: Homemade Tagliatelle

What you see above is the delicious result of a few hours in the kitchen yesterday-tagliatelle with basil pesto. After learning how to make fresh egg pasta last summer on vacation at an organic cooking school in Tuscany (yes, I was that lucky!), I've resolved to make pasta at least once a year. My great grandparents, particularly my Pop-pop Andy, used to make "homemades" regularly and it makes me happy to carry on the tradition. This was the second time I made them on my own and I am SO happy to report that they turned out far better than the first time. I had no problems what-so-ever and I really feel like I understand what the dough is supposed to feel like when it's ready to rest (which happens, for me, after about 12 minutes of kneading). It didn't stick together, it cooked to a perfect al dente and I was very proud of my contribution to Easter dinner. Here's a little peak at my process.

I made two batches, so this is the first one. Ingredients in the pasta were about 400 grams of semolina flour and 4 eggs. I used a fork to break up the eggs and whisk them together, gradually pulling in the flour. Once it was together enough, I started mixing it with my hands until it formed a ball that I could knead.
I'm pretty sure this is exactly what my Grandmom Theresa's hand looked like when she was kneading and I now totally understand why she had such strong forearm! It's very hard work, but I've gotten the hang of the mechanics so I let the soothing nature of the repetition take over and distract me from the hard work.


Here are the happy dough balls resting. After kneading each until the dough was elastic and smooth, I let them rest for 15-30 minutes, lightly covered with a towel. (One good way to tell if they have been kneaded enough is to push your finger into the dough. If a slight indentation remains and slowly bounces back, it's ready.)


After resting, I cut one ball in half and used a rolling pin to start rolling out the dough. Once it's thin enough, I start passing it through the pasta machine. This picture is after about two more times through the machine. One of the things that I had trouble with the first time I made pasta at home was that it got two thin because instead of relying on the feel of the dough, I followed the recipe exactly. With our pasta machine, I go to the second to last setting before cutting, #4, (the recipe says to go to the next to last which would be #5). This adjustment made a huge difference.


Here you can see me passing a piece of dough through the machine. Each time you put a piece through it needs to rest for a minute or two, which allows for a nice slow and steady pace.


I covered our dining room table with a cotton table cloth and laid out all of the pasta to dry for about 2 hours. It was all carefully straightened so that none of the pieces were touching (which would make them stick together) so this picture is as I was gathering them up to put into boiling water. It cooks fast and only takes 2-3 minutes. I love the texture of this type of pasta and am thining that if I only made one batch at a time, I could do this on a more regular basis. If I get my own pasta machine that is!
And here below is the other food highlight of the weekend at home with my parents, my sister Katie and her hubby Dave and my Aunt Chrissy.

Ricotta pie! My mom went all out and made a lattice top to the pie, which she told us she used to do when we were little. It was a great touch because it means that there was more crust with each slice, which in my book is always a plus, especially when you are eating pie for breakfast as we always do on Easter. I'm looking forward to enjoying leftover slices for the next day or two!