Showing posts with label Craft: General. Show all posts

Tuesday, August 9, 2011

Simple DIY: Wedding Hair Comb

After I had my hair trial at the salon for my wedding, I knew that there was a spot in the back of my head that could use a little adornment. I had never planned to wear anything fancy in my hair (my hair is curly and is usually enough on it's own!), but I knew that a bit of sparkle would be an excellent touch.

Since I only had about a month left before the wedding when I realized this need and everything I was finding online was both too ornate and too expensive, I decided to see if I could make something myself. So I went to Micheal's and picked up some plastic hair combs and thin gold wire. I then gathered some of the left over beads from my dress, along with a little pile of Swarovski crystal beads that I had been saving after I broke the bracelet that they were in (a bracelet that I'd made for myself a few years ago when I went through a beading phase). 


I cut a length of the wire, twisted it around one side of the comb a few times, then threaded on beads, one at a time, and wrapped the wire around the comb as I went. I did two passes—the first one with the larger beads, then the second with the smaller, more sparkly beads. And in a matter of minutes, I had it done, which was amazingly quick. 

I loved how simple it was to make and how it gave me just the hint of sparkle that I wanted. To which I say, when in doubt, diy!

Wednesday, February 9, 2011

How to Make a Mini Heart Garland

 My super talented friend Sarah has a handful of lovely Valentines Day crafts on her site, including this lovely mini heart garland template that's available as a download.
You can choose any (or all!) of these hearts in a pdf, and then turn them into a simple garland with just the help of a needle and thread. I love the one in the middle with the tiny polka dots and plan to make a few cards out of a sheet that I printed off. I'm thinking an abstract assortment of hearts on a plain white or kraft paper card will be a sweet way to share a little love.
I particularly enjoy these hearts because they prove—just like my invitation bunting—that you can do a lot with basic materials like paper and scissors. And sometimes, remembering that is the most empowering thing!

Friday, June 18, 2010

Friendship Bracelet Friday


The deadline for the friendship bracelet swap is fast approaching and I am so excited about the latest batch that I've gotten in. This one is from Allyson of the Sweatshop of Love and I am in love with her interpretation—interlocking bracelets made with yarn...so darn cool. (Which makes me wonder how I decide which one I get to swap with? It seems unfair to pick my favorite for myself...any thoughts?)


The next one, which again is so impressive as creating a design within a bracelet is something that I never learned how to do. This one is from Mala and I am also really digging her color combo—just in time for the 4th!


Apparently you swappers have been very modest about your bracelet making skills—check this one out from Kimberly which makes use of a bead as a hook, in addition to having a cool pattern.


You know, in addition to reminding me how much I love friendship bracelets and making new friends, hosting this swap has also given me the joy of getting a lot of really great mail. I am going to try to make a concerted effort to send more mail so that I can pass that on a little bit. And on that note, happy Friday and enjoy the weekend!

P.S. If you have a bracelet that you just haven't mailed yet, but you want to try to squeeze in at the last minute, let me know and I'll be sure to include you in the swap next week.


Thursday, June 10, 2010

Friendship Bracelet Swap: More Mail!


Today is June 10, which means you have 10 days to get your friendship bracelets to me for the swap! I got a few more over the past week which I'm excited to share with you. I wasn't expecting the range of bracelets that have come in, so that has made mail call a lot of fun each day!


Above is the awesome two-strand bracelet from Casey, and the load of floss that she sent in for me to donate. And her so sweet hare card. Whoever gets this in exchange is a lucky lady!


This one is from Susan, who did a very awesome split and change up in the middle, showing off our two favorite styles of bracelets. Love!


Okay, Felicity's bracelet is going to remain a secret because I both love her little folded envelope and I am not certain that I could put it back together if I opened it. But thank you Felicity for including some extra materials!

And the last in this batch is from Kathi, who made her bracelet in a style that I have never seen before. It's very circular and impressively professional looking. Kathi, if you read this and you know of a link to a tutorial to make this kind of bracelet, please do share—I'm very curious about the process.

For the rest of you who have signed up, the weekend is coming, so it's time to get making! Actually, these don't take all that long to whip up, so I hope you can find some time to complete yours. And a big thanks to everyone who has sent theirs in already.

Wednesday, June 2, 2010

Friendship Bracelet Swap: They are Starting to Arrive!


When I was first thinking of hosting a friendship bracelet swap a few months ago, I admit that I was slightly intimidated by the logistics of it. For example, I had a deadline to sign up that has mostly proved to be meaningless—which means that if you are just finding out about it, feel free to email me at thingswemake [at] gmail [dot] com for more information! Anyone who can make a bracelet and send it to me to arrive no later than June 20 is completely welcome aboard.


Okay, now to the fun part. The bracelets! I love (love!) getting these little packages in the mail and I'm going to share them all with you as they arrive so that you can see what other people are making and see what you might wind up getting in exchange.


Up above is the AMAZING collection from Little Messy Missy. I was blown away by the assortment—yes those are charms on the ends of most of the bracelets! Each one is a little bit different and she was so kind as to include a bag of floss to add to my donation to the girls of my local Boys & Girls Club.


This second one is from Breanna (on twitter here) and I love the color combination (pretty similar to my own) and the sweet note that she included for her soon-to-be new friend.


Keep them coming!

Tuesday, May 25, 2010

Friendship Bracelet Making: 15 Years Later, I Can Still Do It


 First, I'd like to thank everyone who signed up for the friendship bracelet swap—we have more than 30 people on board and I can't wait to see what everyone makes!

Over the weekend, I pulled out some of my old bracelet making supplies (I used to have stacks and stacks of floss wound around those little white holders) and gave my old skills a test. Turns out that I, amazingly, actually do remember how to make the bracelets—and I would guess that it's been, oh about 15 years since I've made one. So that was a delightful surprise (I guess making so many really drilled it into my head!). I started making two, using two separate techniques, though both involve knotting in what I can only describe as being in the shape of a 4.


The two styles show above are the only two that I ever made using embroidery floss—though I did make gimp bracelets for a while, but that's an entirely separate topic! I'd love to hear how the making is going for everyone participating in the swap- are you remembering how to do it?

Wednesday, February 3, 2010

Tutorial: Patchwork Pillow Covers

Ask and you shall receive! Here's how I made my pillows (though please keep in mind that this is definitely easier after you do one, and the point of patchwork is decidedly not to be perfect!)

Patchwork Pillow Covers
Materials
1 1/4 yards fabric*
Scissors
Quilting Ruler
Cutting Mat
Rotary Cutter
Pencil
Pins
Needle
Thread
Sewing machine (optional as you can do this by hand)
Iron
Pillow insert (mine was 18x18 inches)


*I used a yard of the linen bird fabric and scraps of the creme silk border- about two to three inches all around the front panel, so I started off with one yard-sized piece of fabric.

1. Cut your yard of fabric in half, then in half again so that you have four equal pieces of fabric (they might not be exact squares—that's okay).
2. Working with one side of one panel, use your quilting ruler to measure 2 1/2 inches from the edge. Cut with your rotary cutter and set the strip aside. Rotate your panel clockwise and cut 2 1/2 inches from that side. Set the strip aside and continue rotating and cutting until you get near the middle.
3. Use your own creativity to cut the middle piece how you like it. Each of my fronts was done a little differently.

4. Arrange your strips to remake a square, using the longer pieces towards the outside and working inward. I did not line up my pieces exactly how I cut them because I wanted to make one fabric look more interesting.
5. Turn over each piece, one at a time, and use your ruler to mark a 1/4 inch seam allowance with a pencil. (This will help you to sew straight lines.)
6. Starting in the middle, pin two pieces together and sew. Iron your seam flat. Continue pinning, sewing, and ironing until you have the entire panel sewn, trimming excess fabric when necessary.

7. Measure your panel. You want it to be 1 inch larger than your pillow insert on all sides. My pillow was 18x18 inches, so I used the border (my pieces were 2-3 inches in width, which was more than I needed, but it gave me some room to play with) to make up some of the space that I lost from my seam allowances.
8. Measure your border pieces to the length of each side of your panel, mark your seam allowance on one side of each piece and pin along that side to your panel.

9. Sew your border.

10. To make the back panel (which has an overlap so you can insert the pillow) take one of the remaining three pieces of fabric (that you cut in Step 1) and fold it in half. Iron to crease and cut. Fold over one long edge of each side about a half of an inch. Iron to crease and sew. Repeat with the other piece.

11. Place your front panel on a surface, right side facing up. Arrange your two back pieces on top, overlapping the sewn edges by about an inch and a half. (This gives the cover enough room to expand to accommodate the roundness of your pillow.)
12. Make sure that the back panel measures a little bit more than the final size you need—for me, this meant that I measured to make sure that my back panel was a 19 inch square, which it (remarkably) was.
13. Pin the two back pieces together where they overlap and sew in, horizontally, about two inches. This will help the back of your pillow to not gap excessively.

14. Return the back panel onto the top, right sides facing and pin together. Since my back panel was the size I was aiming for, I used it as my guide. You may need to mark lines to achieve your intended dimension. Iron the seams flat when you are finished sewing. Trim any long threads.

15. Your pillow cover is done! Insert your pillow to make sure that it fits. You can remove the pillow insert to trim any excess seam allowance at this point, though do make sure you try the pillow out before you make that commitment!


ript>

Monday, January 11, 2010

Quick Craft: Fabric Rosette Cards

As I'm working away on a big quilting project, I need, on occasion, something smaller—a project that gives me almost immediate results. Since I needed two birthday cards, I decided to whip up some using the blank cards I received for Christmas. Here was my process:
1. Pull out one of the bins where I store fabric scraps.
2. Dig around until I found pieces that I felt like using, which in this case was a bit of the Liberty fabric that I used to make these window panels.
3. The pieces were in long strips and for some reason they had been stitched (I can't remember why), so I trimmed them with pinking shears, and used Mod Podge to adhere each strip to the upper third of the card.
4. Not satisfied that the strip was special enough, I used other thin strips to make rosettes (you can see the technique here).
5. I stitched on the flowers, admired my work and that concluded my quick crafting session.

Making both of these took about 10 minutes total, and given that I'm very pleased by the results, I'd say this was a successful craft.

Tuesday, January 5, 2010

Mom's Quilted Wall Hanging: Completed!

In just the nick of time, I finished my mom's wall hanging! I actually didn't sew the hooks on until after Christmas, but otherwise it was totally done.

That's my momma, holding the quilt up so we could see how it looked on a wall (note, the wall it will actually hang on is pale yellow, and it get a ton of sunlight so it will look much warmer). All of the quilts I've made have been big-life-event presents, so this was my solution to make something for my mom concurrently with my larger projects. She was very happy with the results, which of course made me even more happy.

Here you can see the back and the hooks. I sewed four strips to the back to hit just below the binding at the top so that you won't be able to see the hooks or the rod when it's hanging. That way, as my mom wanted, it will look more like a painting than fabric.

I was the most nervous about this step, but I was really pleased with the way it turned out. And most of all, I'm delighted to have finished another quilting project that I know will have a good home.

Wednesday, December 23, 2009

Recycled Ornaments by Becca, Katie, Kim, Suzi and Pam

Becca Huben
City/State: Guilford, CT
Ingredients used: pipe cleaners, Easter chicks, glue, audio tape
General instructions for making: I started out by knitting the audio tape (yes, knitting!) into i-cord (it's like a tube) and made a small circle / nest. The Easter chicks sit inside, and have pipe cleaner "hats" - one a Santa style, the other is a Rudolph / Reindeer style. More pipe cleaners were used to make the wreath and the hanger.

Katie Clemons
Berlin, Germany
1 toilet paper roll, paint, and string
1. Paint the outside of the toilet paper roll.
2. When dry, cut out three rings roughly 3/4" wide and fold them into Vs.
3. Bring the bottom point of each V together and wrap with string to attach them to one another
4. Open the pedals of your new flower.
5. Tie a string through one of the pedals to hang from the tree.

Katie Clemons
Berlin, Germany
2 security envelopes, paste, and string
1. Cut out circles and fold in half, patterned side in.
2. Paste semi-circle pieces together one at a time.
3. Before adding the last circle, add your piece of string to hang the ornament.


Kim Woodward
Rock Island, Illinois
Ingredients: Cardboard ornament from Michael's (.50), ribbon, scrapbook paper, Modge Podge, eye rings, photos
Instructions:
1. Purchase simple, circle cardboard ornaments from Michael's
2. Add coordinating blue scrapbook papers as a base on each side with Modge Podge.
3. Add circle-shaped photos to one side of each ornament.
4. Modge-podge several layers for a glossy finish.
5. Add a ribbon around the edges to cover the remaining cardboard.
6. Add a small eye-hook from a hardware store to the top to add a hook or ribbon to hang.

Suzi Jackson
Guntersville, Al 35976

Shabby Chic Angel Ornament
materials: 4 full size all white paper towels. 1 empty bathrrom tissue roll. 1 button, two toothpicks, 6 inches yarn for hair in your choice of color, 6 inches gold yarn for halo, 4 inches white narrow ribbon, Mod Podge.

Fold two paper towels in half and tear to leave uneven edge. Coat top of tissue roll with Mod Podge and place one half paper towel around top to form dress.coat with MP. Fold second half length wise, coat with MP and allow to partially dry, while tacky place around bottom of dress to form ruffle. Mod Podge ribbon over seam. Coat two half pieces of PT with Mod Podge and shape into wings. Fold in top sides of tissue roll and place wings into each fold. Staple or paper clip in place until dry. Fold two short pieces of PT, coat with Mod Podge and shape into arms. Place arms on front with hands together. Mod Podge button where hands meet. Shape one full piece of PT into angels head and coat with Mod Podge. Place toothpick into head and into neck, snip yarn into short lengths and Mod Podge onto head for hair. Draw eyes and mouth. Coat gold yarn with MP and shape into halo, attach to second toothpick, attach to back of neck. Allow to dry and attach hanger.


Pam Harris
Vancouver, Washington

Recycled version of yarn star ornaments

Ingredients:
Cardboard shipping boxes
yarn saved from a failed project
re-used gift tag
all the bent sewing pins fished out of my box of pins
glue or Mod Podge
needle with large eye for yarn
scissors
re-used aluminum foil, foil paper or wrapping paper

See full tutorial here


Tuesday, December 22, 2009

Recycled Ornaments by Ruthanne, Deanna, Tracie, and Alyson

Ruthanne Dolezal
Here is an ornament I made this morning with 2"corners of a Christmas card envelope. The wire from a used 6" twist tie joins the top and bottom points and serves as a hanger. Thread and glass beads pull the horizontal points together.

I think there is a miniature world of origami possibilities using envelope corners. I hope to find time to explore it.


Deanna Shouppe
Midlothian, TX 76065

This is my recycled Christmas ornament. I have been recycling glass jars b4 I knew that is what it was called. A list of what was used:
empty cleaned small glass jar (saved it from a travel vaca many years ago, it is a single serve condiment jar) jingle bell--from another project
gold top taken from the jingle bell a few inches of red ribbon- I had a piece left over from another project it was about 7 inches long and I kept it long so I could make sure I could tie many knots so the ribbon would not pull thru the hole in gold bell topper strong glue, I used e6000 that I had on hand but any super glue will do. red glitter paint/gel

First clean the jar very well, I always clean any glass surface with rubbing alcohol, gives me a really clean surface. I poured the red glitter paint, (I had this on hand, just the very end of the bottle, but one could use clear acrylic and glitter I suppose) and swirled it inside of jar with my finger so that I could be sure entire inside was covered with sparkle. After dry, which did not take long. Then I placed red bell inside jar. Meanwhile, jar was drying I "painted" with my finger the lid of the jar. When dry, I screwed lid on top. I used an a screwdriver to punch a hole into top of jar/center as best you can so ornament will hang well. Then double ribbon, and thread thru the underside of lid , thru the hole in gold bell topper and knot knot knot. I then placed a bead of glue onto ribbon to make sure knot will hold and then bead of glue around edge of gold bell topper and place
On top of jar lid. Viola, there you have a beautiful, wonderful ornament for zero money!

I hope you enjoy it. I hope I win! But if not, it is still worth it because you pushed me, my mind and imagination.

The brown snowman are sea beans that I collected on the beach after Hurricane Ike. I love rustic, natural look too. From one extreme to the other! LOL. My brown snowman was also free, I used a drill bit and kitchen twine. And came up with many other ideas but dh reminded me that I had gifts to make for our children so I had to get busy! Thanks again. If these pics are good, would you mind letting me know how I can take a better pic for web viewing. Oh yeah, my ornament holder, you are gonna love this, is an old, just had to have it, impulse item, a head massager, lol makes a great art piece!

Tracie
Pinckney, Michigan
Plastic Bottles and some natural baby pine cones
Cut various plasitc bottle into circles then heated the circles up with a heat gun. Cut the bottom of a plasitc bottle then cut out the inside of it to make a "ring" shape. Hot glued the circle chips around the "ring" added the baby pine cones as well as some fishing line in order to hang on the tree
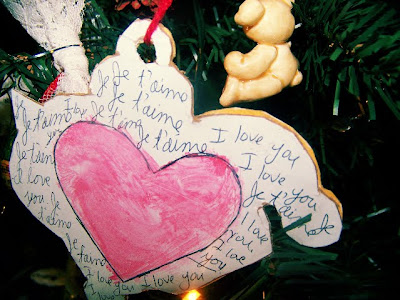
Alyson Lamanes
Hamilton, Ontario Canada!

Ingredients used
cardboard box, paint, recycled notebook, pen, paper, glue, paint chips, yarn

General instructions for making
1. Draw a shape on the back of the notebook. Cut it out, then trace on the thicker cardboard. I used a thicker snack box, but any sturdier piece of cardboard will do. Make sure you cut a hole at the top so that you can attach a string or hook to hang it on the tree.
2. Draw a picture on the notebook side of the cardboard, and then trace it over with a piece of paper so that you have the same image of the two pieces of paper. Then lightly paint the cardboard so that the image doesn't show through as much.
3. Cut out each piece of the picture, trace it onto brightly coloured paint chips. Cut out larger pieces first such as the faces and hats, then layer them on top. (I'm a designer at heart, so every time I go to a hardware store, I always grab paint chips. They're always so bright, and I never find a use for them!)
4. Glue the pieces securely in place, and then glue the two pieces of cardboard together.
5. Feel free to do the same with the back, or decorate freely. On the back of mine I drew a heart, painted it red, and wrote "Je t'aime, I love you."
6. When dry attach string and hang!


Monday, December 21, 2009

Recycled Ornaments by Tammy, Fawnda, Vicki, and Abbie

Tammy James
I made this star from recycled clam shell packaging.
I traced a chipboard shape onto the thick plastic and cut out the star design, then put a slit into each star so they could fit together.
I mod podged the plastic surface and used it to apply a single layer of a paper napkin.
Once that dried I coated the whole lot with a glitter paint for some shimmer.

I joined the two sections, pierced a hole in the top, added a hanging cord and tied a bow and Volia!

Fawnda Norman
St Paul
State: Minnesota

Ingredients Used: Old Christmas Cards, double sided tape, Paper cutter, Scoring tool, Wallet sized Photos, reused twine or ribbon, chunky bead

1.) Cut your cards in to 3X3 inch squares and group them by color. You need 6 squares for each ornament.
2.) On the back side of each square find mark the midpoint on each side (at 1.5 inches)
3.) Score a diagonal line connecting your midpoints. You should have 4 score lines. Your score lines should make a tilted square inside your big square. Do this on each square.
4.) Fold on your score lines.
5.) Choose two squares to be your top and bottom. Find the middle (I drew lines across from each corner to find mine) and use your Exacto Knife to cut a whole in the center.
6.) Use your double sided tape to connect your 2 of the corners of 2 of your squares (Not the top or bottom- put those aside for now) You will be sticking the "wrong" sides together.
7.) Continue connecting until you have 4 of your squares together that make a square "tube". (it should look like a pointy cube with the top and bottom missing)
8.) Choose the bottom and sting your twine or ribbon through the hole and attach onto the bottom of your "tube"
9.) Pull your twine up through your tube and through your top piece. Connect your top piece to the rest of the ornament.
10.) Tie a loop on the top. And tie a bead onto the bottom.
11.) cut out your photos (about 2X2 inch square) and attach it to one of the sides.


Vicki Flinchum
Round Rock, Texas

Tools:
Zutter Bind It All
Cuttlebug
Spellbinders Nestabilities

Supplies:
Vintage Sheet Music
Modge Podge
Ranger Glossy Accents
German Glass Glitter
Zutter ½ inch Owire, red
Miscellaneous Ribbon

Before starting, remember: Measure twice, cut once.
Cut seven (7) circles out of vintage sheet music with Nestibilities. Lay them on wax paper and cover one side with Modge Podge. Let dry, turn over, repeat.
Trace outer edge of circle with Glossy Accents and sprinkle with German Glass Glitter. Let dry, turn over, repeat

Abbie White
New York, NY

recycled green and black paper
yarn
mod podge, of course (just in the back, not to seal)
embroidery hoop
some stickers
masking tape

Cut out the circle and bird. mod podge bird to circle. tape (low-budget) to embroidery hoop. add yarn. Hang on tree.


Sunday, December 20, 2009

Recycled Ornaments by Kelly

Here are two ornaments that were made and sent in by Cadley's mom. Can you imagine the fun they must have in that house?!

“Festive Frosty”
by Kelly Jackson
Guntersville, Alabama

This Festive Frosty was made of clippings and scraps swept from my workroom floor! I never throw anything away!

Materials: scrap of velvet upholstery, white
Mod Podge
White glitter
Scraps of paper, orange, decorative
Tulle clippings
Small piece of faux fur cut in circle
Scrap of yarn
Pipe cleaner
Paint, black, pink
Wad of fiberfill
Hot glue

Process: Make a large “yo-yo” and stuff with fiberfill or any recycled stuffing (plastic shopping bag)
Stitch closed. Smear all over with Mod Podge, sprinkle with glitter. Dry.
Paint eyes in black, cheeks in pink. Dry.
Hot glue orange paper nose (folded into triangle)
Hot glue pipe cleaner to top of head (this is hanger), glue yarn wad on top of this, glue hat (folded into triangle: deco paper) on top of this.
Gather tulle into a ruffle, glue under neck.
Glue fur scrap under tulle.


Retro Rudie Ornament by Cadley Jackson

Yes, I know, this is awesome. This ornament comes from Cadley Jackson of Guntersville, Alabama, where, from what I can tell, she and her mom Kelly have a fantastic time being creative together. (You'll be seeing Kelly's ornaments soon!) Cadley is 12, which I point out because I find this ornament to be extremely sophisticated and well executed. And I love the mix of materials that Cadley used. Here's how she made her Retro Rudie:

Materials: 1 toilet paper tube, old book pages, “whales” cracker box, Mod Podge, pipe cleaners, sticks & twigs, oil paints, scrap of ribbon, Christmas garland scraps, colored markers, spray glitter, one real red berry, hot glue

How to make: Cover toilet paper tube with Mod Podge and glue on the old book pages.
I cut out a head shape from the Whales box. The inside is brown. Cut a slit in the tube and insert head. Add some Mod Podge to hold it in place. I cut an ear shape from the Whales box and covered it with old pages paper. Cut out an eye shape. Color eye with markers. Glue ear and eye to head. Then I poked holes in the tube for the pipe cleaners. I used one pipe cleaner for front and one for back legs. I used hot glue to hold the legs in place. I used oil paints to rub color onto the body, legs, face and ribbon. I like to make things look old. Then I hot glued on snips from Christmas Garland as trim on the head and neck. I hot glued on the red berry as a nose. I hot glued on twigs as antlers. A paper wad is glued on as the tail. Last, I sprayed the whole thing with spray glitter. I just love it! I hope you do too!

Saturday, December 19, 2009

Recycled Ornament Contest Winner Annoucement!!!

After looking through all of the entries, the other Amy and I have decided that the winner of our Handmade, Recycled Ornament Contest is Candy Glendening of Redlands, California!!! These are her mod house ornaments, which just blew us away. Here's a look at one up close:


Candy makes art quilts, so it's no wonder that she found herself with loads of brightly colored fabric scraps to work with. Here's how she made them:

Scraps of hand dyed fabrics
Peltex
Thread (for sewing and for the loop on top)
Needle
Scissors
Hot glue gun

(As a an art quilter I can always use the fabric scraps SOMEWHERE, I had this huge bag of small oddly shaped scraps of peltex that has been sitting in my closet for just such a recycling project as this!)

General instructions for making:
I cut each house shape out of the peltex pretty much by eye. Then fused the fabric to the peltex, inside in out. I then created small, abstract art quilts on each side by collaging more of the fused fabric and then free motion quilting for emphasis. I then fused the sides together using strips of the fabric, glued the roof on with hot glue and stitched a loop through the top!

You know that I'm a quilter, so I was naturally attracted to these- and the other Amy has been working with fabric since she was 10- but we were both really impressed by the execution and the idea. Congrats Candy! We'll be sending your prize to you asap!

And now for the two runners up!

The mini terrarium by Sarah Wolfgang of Des Moines, Iowa!
Sarah used a Gerber baby food jar, buttons (for the flowers! how genius is that!), wire, and Mod Podge. She was aiming to replicate a live terrarium and I think she did a great job, particularly with the jar sitting on top of a little log. She cut a hole in the top of the jar and pushed a loop of ribbon through to be able to hang it, and secured it on the underside of the lid with a knot.


And the second runner up is Becca Dulgarian from West Jordan, Utah for her paper mache Christmas Ornaments! Amy and I LOVE the polka dots and bright colors on these ornaments, and that she gave new life to things sitting in a thrift shop and around her house.
"I'm completely in my element when I can create something wonderful out of old material so when I got word of this contest I was thrilled! I am a GREEN girl and love how this project turned out!"

Ingredients used:
Recycled Glass Christmas Bulbs! (I bought a 24 pack at my local Thrift Store for 50 cents! SCORE!!)
Newspaper
Mod Podge and Water
Paint
Ribbon for hanging

Basically you rip thin strips of newspaper, dip them in a one part water, one part Mod Podge solution and cover the glass bulbs completely with the strips. Let them dry over night and then paint them! I used simple paint techniques and bold colors. I string mine on Ribbon and hang them through out my home on door knobs and cupboard doors! I also have them displayed on my Door as a Welcoming Holiday Greeting! (See the full tutorial here.)

We had a terrific response to this contest and I'll be sharing the rest of the entries with you between now and Christmas because they are just too good not to post. Check back tomorrow for a very special ornament from the next generation of crafters who's going to take the blog world by storm in a few years, I can just tell!

Special thanks to Amy of Mod Podge Rocks for being the most awesome co-hostess!