Thursday, April 30, 2009

Upcycled Handmade Cards

Today is my best friend Virginia's 28th birthday and I figured that while I am surely going to both email her and call her with best bday wished, I might as well give her a special shout out right here. So Happy Birthday V!! Above is the card that I sent her, made with strips of the fabric that I used in a quilt I gave her and her fiance Dan. I used spray adhesive to secure them to a plain baby blue card and then used glittery letter stickers leftover from an Easter egg dying kit. V is a freelance writer and she was recently referred to as a "green goddess" which means that she is the go-to girl for all things eco, particularly when it comes to the beauty industry. I thought that making her an upcycled card was exactly the thing to do.
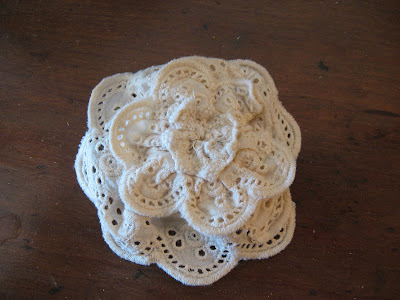
And this is a little gift that I sent along with her card. I recently cleaned out my closet and I had this little shrug that had gone totally out of style (and honestly was just not that flattering), so I took off the edges and made this three layer fabric flower pin, again modeled on the technique I saw here (though again, I did it by hand). As I mentioned, I did three layers of the flower and it turned out a little bit off center, but I sort of like that it's doing it's own thing.

And just to share something from Virginia so you can see just how crafty she is, above is a card that she recently made for me. The letters for my name are cut out from The Nation and the strip of buttons was the holiday wrapping from Anthropologie. It's all glued to a slightly shimmery card and is just so darling. I love this craft swap thing we are currently doing with leftovers!

So V, I hope you have a fantastic day and that you get a nice big piece of chocolate cake!

And for everyone else, keep the comments coming for the giveaways- I just love hearing about our favorite spring foods and weekend food rituals. I also want to take a moment to thank you all for being here with me and for participating in the blog. It's really made my little world a better place!


Wednesday, April 29, 2009

Giveaway: Spring treats from King Arthur Flour!

Back-to-back giveaways...I know, too good to be true. But it is! And today's is another great one from my friends at King Arthur Flour. Elizabeth's comment yesterday asked if I'd ever been to their headquarters up in VT where they have a bakeshop (oh, a girl can dream!) and I haven't but I am a big fan of their products. Particularly their dough whisk, which I can attest will transform the way you think about making homemade bread.
Anyway, I love their mission, trust their brand, and have only ever had terrific experiences with the people who work for the company (especially Allison!). They are generously offering a giveaway that includes three of my favorite products of theirs for spring including...

The Honey Lemon Cake Mix (pictured above)

The Beehive Cake Pan (what it makes is above, the actual pan is below)


To enter, post a comment by 11:59 EST Monday May 4th (with a user name) about your favorite weekend food ritual—past, present or future. Mine is making myself a latte with my stove top espresso maker and my Nespresso milk frother (which may seem expensive, but the results are amazing!!) and reading a totally absorbing book in bed like Come Sunday, by Isla Morley. I can imagine that adding a piece of this cake into the mix would take my ritual to a whole new level!

**You are more than welcome to enter as many giveaways as I post, so if you entered yesterday's, make sure you enter today's as well!

Tuesday, April 28, 2009

New Book Giveaway: Farm Chicks

This week I'm doing two back-to-back giveaways just because I can! Today we have the fabulous new book The Farm Chicks in the Kitchen by Teri Edwards and Serena Thompson. Look how cute they are!
The book is filled with 52 yummy recipes—the breakfast chapter alone makes this a book to add to your shelf—including an Apple Puff Pancake, a Cherry Breakfast Swirl, a Nutmeg Coffee Cake and my favorite, a Maple Scone recipe (which is below so you can make it at home!). Everything is comforting and presented in a straightforward, yet compelling style.

And in the mix with all of the great recipes are fun crafts like the Scone Cozy above. The book is very country, very charming and completely makes me want to put on an apron and get into my kitchen. To enter to win a copy, post a comment (make sure to include a user name!) by 11:59 EST Friday May 1 about your favorite seasonal spring food (like asparagus! or rhubarb pie!). I'll choose a winner at random and will post it on Monday morning, May 4, so you'll have to check back then to see if you've won.

Enjoy the recipe for the Maple Oat Scones and make sure to check back tomorrow for another giveaway from King Arthur Flour!

Maple Oat Scones
These scones are great because they’re sweetened with just a bit of maple syrup, making them not too sweet, yet full of delicious maple flavor. They’re the perfect accompaniment to your morning cup of coffee or tea.

1 ¾ cups all-purpose flour
1 ½ cups old-fashioned rolled oats
2 teaspoons baking powder
10 tablespoons cold unsalted butter, cut into small pieces
1/3 cup heavy cream
¼ cup maple syrup
1 large egg, slightly beaten
½ cup chopped walnuts (about 2 ounces)
Maple Glaze (recipe follows)

Mix the dough: Heat the oven to 425˚F. Combine the flour, oats, and baking powder in a large mixing bowl. Use a pastry blender or two knives to cut the butter into the flour mixture until the butter is the size of peas. Add the cream, maple syrup, and egg; mix with a wooden spoon until well combined. Stir in walnuts.

Bake the scones: Turn out the dough onto an unfloured work surface and form into an 8-inch round about 1-inch thick. Cut into 8 wedges and place on a baking sheet. Bake until lightly browned—15 to 18 minutes. Remove to a wire rack to cool. Meanwhile, prepare the Maple Glaze.

Glaze the scones: Drizzle the cooled scones with Maple Glaze and serve.

Maple Glaze
Combine 1 tablespoon melted unsalted butter, 2 tablespoons maple syrup, 1 tablespoon heavy cream, and 1 cup confectioners’ sugar in a small bowl and whisk together until smooth and lump free.

Here are two other of my favorite things in the book:
The strawberry rhubarb pie...

and aprons made from vintage sheets!

Monday, April 27, 2009

Field Trip: NY Botanical Garden

As you can tell, I did make it to the New York Botanical Garden up in the Bronx this weekend, which was pretty glorious. I loved the novelty of getting off of the subway in a neighborhood I'd never been to and then walking into an expanse of green grass, flowering trees and rows and rows of flowers.
Plus, everyone there seemed pretty cheerful given the sudden burst of summer-like weather. I even saw three little kids, in totally separate instances, chasing their shadows. It was completely adorable.


I believe this white flower is a heliobore, though I am not even going to pretend to know my flowers! It's certainly pretty, no?


This was a view down one of the walkways and gives you a pretty good idea of what the main part of the garden looks like.


I seemed to have missed the signs that could have told me what kind of tree this was...


Oh, this was the pathway into the native forest. The Bronx River also ran through it, which was a nice touch.


Some lovely burnt orange tulips in the plots in front of the conservatory. So this is how I spent much of my Saturday. What about you? I'd love to hear how you spent your weekend, particularly if it involved being outside in nature—or doing something new.

And for a little sneak peak, I have a fantastic giveaway coming up on Wednesday from King Arthur Flour. Make sure you check back then to enter!!

Friday, April 24, 2009

Inspired Image: Erica of PS- I Made This


Hello, my name is
Erica Domesek.

You can find me at ps-imadethis.com and follow me twitter.com/psimadethis.

This image comes from the leftover champagne corks from my friends baby shower.

It inspires me because cork is such a fantastic material. It’s light, has great texture and coloring. Great material for spring!

I particularly love that there were ANCHORS on the champagne corks. I’m really into ALL things nautical.

It makes me feel creative when I can use everyday objects and invent, design, and create a new use or style!

The 3 words it conjures up are unexpected, chic, dramatic.

***

Also check out Erica’s fantastic Craft Club webisodes for Alloy’s Teen.com TV. The latest one is on “channeling your inner flower child with a chic headpiece”. I’m a little in awe on all accounts with today’s post. Such great crafting ideas and excellent branding design, right? So happy that I could introduce you to Erica’s site. Oh, and here's another of her cork projects, the Cork-tastic necklace, just for fun (and because it's amazing!).


Okay, I need to be a little NYC-centric for the moment: It’s forecast to be 85 degrees and sunny tomorrow and Sunday. I’m not sure if I have always been this antsy about warmer weather getting here, but I definitely have spring fever this year. And to celebrate the weather, I’m considering a trip to the Botanic Garden…or Ooh, maybe the Cloisters. I will let you know where I end up Monday! Have a lovely weekend everyone!


Thursday, April 23, 2009

Q & A: Stephanie of Sweet Margarita


I am happy to introduce Stephanie, a new-to Etsy jewelry maker (her shop is called Sweet Margarita) who makes some very cool mixed media pendants. As someone who believes in the power of positive adornment—wow, that came out before I could catch myself. By that I mean that I really believe that what we wear and how we accessorize can influence our mood. About two months ago, I bought myself my first "real" piece of jewelry from one of my favorite designers, Sherry of Pequitobun to celebrate a personal milestone. And not only do I just adore the actual necklace, but wearing it has a real emotional significance—which makes it a pleasure to wear.
Anyway, back to Stephanie. I like that she has created pieces that might give the wearer a push in the right direction...it's easier to be a rock star if you read the words on a chain around your neck, right?! I think so. Okay, I'll stop talking now and let you hear from Stephanie.

Where do you live?

Troy, MI

Is this your full-time job or simply something that fulfills your creative side?
Making jewelry is my full-time job.

How did you get started making your pendants?
I've been designing jewelry for about 10 years now. I made a resin/epoxy ring for last year for my sister's birthday gift and the whole process intrigued me. I knew I wanted to explore it even more.

Tell me a little about the process involved in making one.
Each pendant is actually a collaged piece of artwork. First, I decide what "sentiment" I want to use for the piece. Next, I sit down with all of my colorful papers, scissors, paint, stamps, and get started. All of my pieces start out with a drawn circle base, then I begin cutting and layering paper. Last I add in details with paint and stamps.

What's your favorite part of creating your jewelry?
The ultimate satisfaction in holding something in my hands that I created. It never gets old :)

Where do you find your inspiration?
In addition to making jewelry, I also paint...I have a true love for all things colorful (my husband even has to deal with sheer orange curtains in our living room). So, I'd have to say that color has a lot of influence in my thought process.


What's the best part of your day?
Spending time with my daughter, Savannah.

Tell me one thing that you cannot live without.
Just one? That's tough.....it would have to be my family. I think they might be mad at me if my first thought ((caffeine)) beat them out.


Wednesday, April 22, 2009

Childress Wines (and Shrimp & Grits)

The year after I graduated from college, I lived in Durham, North Carolina. I was there as an AmeriCorps Member with Habitat for Humanity so I spent most of my time on the construction site (which is why my friends are always coercing me into hanging pictures and shelves fort them!). I’ve always said that of all of the places where I’ve lived—which includes South Jersey, Los Angeles where I went to college, NC and now NYC—I’d move back to NC in a heartbeat if I had reason to. There was just something about the people, the pace of live, the vibe of it all that suited me.

And while my life is pretty far from that at the moment (I have fond memories of taking the long way to the grocery store so that I could drive through winding farmland), I am always interested in hearing about what’s going on down there. Particularly when it comes to crafts and food. And wine.

I met with the lovely folks from the NC tourism board a year or so ago while working at the magazine and they were recently in touch to share some information about an event at Childress Winery in Lexington, NC on April 24. (If you didn’t know, the state has a huge wine industry!) They are having a white wine release party to release the new 2008 vintages and they will be showing off how the wines pair up with various foods.


Richard, a former Nascar driver, started the vineyard and his daughter Tina Dillon came up with the idea of pairing food and with the new wines. Here’s a sneak peak at the menu for the event so we can all imagine the fun they will have. (If anyone is in the area and happens to be going to the event, please send a report!)

-Barrel Select Chardonnay with Cabot Cheddar Cheese Trio and Shrimp and Grits
-Pinot Gris and The Bistro’s Creamy Crab Dip with Roasted Pablano, Silver Queen Corn, Carmelized Onion, Monterey Jack, and Cream Cheese and Toasted Baguettes
-Sauvignon Blanc and The Bistro Spinach Salad Tossed with Fresh Strawberries, Dried Bananas and Pineapple, Goat Cheese Crumbles,Sugared Pecans, Crispy Proscuitto and Served with Balsamic Raspberry Infused Vinaigrette
-Viognier and The Bistro’s Honey Walnut Chicken Salad
-Riesling and Junior Johnson Country Ham Biscuit
-Late Harvest Viognier with Southern Pecan Pie and Strawberry Shortcakes

(Image above from Letie's Culinaria)

And just for fun, I thought I’d share the Shrimp and Grits recipe because I know that it would be my favorite of the offerings.

Chef David Thomas’ Shrimp & Grits
Yields 6 to 8 nice portions

4 cups water
½ cup cream
2 oz butter
Little salt and white pepper
Dash of Cajun spice
1 cup of shredded cheddar cheese
2 pounds peeled and deveined shrimp (41/50 count)
Chopped tomato or tomato salsa
Chives or Scallions for garnish

Bring water to a boil; add cream, butter, and seasoning.
Gradually whisk in corn grits whisking constantly. Simmer until done about 20 minutes until thickened. Add cheese, taste and re-season if needed.
Sautée shrimp 2 pounds in a little bit of ¼ to ½ stick of butter and 2 tsps. olive oil
Season with a little Cajun spice and cook for 3 to 4 minutes until done
Plating
Spoon grits into shallow bowl and top with shrimp. Garnish with tomatoes, or tomato salsa, chive or scallion garnishes


Tuesday, April 21, 2009

Instant Heirloom: Fran Shea of Zeichen Press

Fran emailed me last week to introduce me to her design and letterpress studio Zeichen Press in Minneapolis. They produce all of their work using antique type and salvaged vintage printer's cuts. They mix their ink by hand and their pieces are printed on recycled paper using their very old and very heavy Chandler & Price Press. I love (LOVE) the witty writing and the style of their designs. Check out some of their newest offerings for spring as I share a little more from Fran about her work. (I kept the questions short in the hopes that you will enjoy the card images as much as I do!)


How did you learn to do letterpress?

A little book was consulted (The Practice of Printing) and much trial and error.


Where did you get your antique type and salvaged vintage printer's cuts?
Old shops that shut down and old collectors. Like anything else, there is a whole subculture of letterpress enthusiasts - young and old - that are determined to preserve the craft/hoard what they can.


What made you decide to produce your work from that perspective?

I have never gasped when I looked at something I printed from my laser printer.


How many people work at the studio?
Two. Jen Shea is my sister-in-law/partner and also the left brain of the company. For a while (40 weeks) Jen had a baby in her belly. So, I guess we had 3 people working in the studio. IF you consider floating and chewing on an umbilical cord "working".


I have to say, I'm becoming more and more into letterpress and the things involved in the process. This is slightly tangential, but a few weeks ago I was down at The Ink Pad and saw stamps made from old letterpress letters. I had to restrain myself from buying all of the "A" stamps...though now that I think of it I can't think of one good reason for me not to have at least one of them. Hmm. I might need to go back!


Monday, April 20, 2009

Weekend Project: Homemade Baby Shower Card

Happy Monday! The weather here in the city was miraculous this weekend. Saturday was like a day straight out of summer, which was lovely considering that spring's been a little reluctant to join us lately. Sunday I took a trip down to South Jersey to attend a baby shower for one of my good friends from grade school. It was so fun to see Tracy pregnant and to catch up with a few of our other friends—two of whom had also brought their kids which made the day even more exciting.

I decided to make a card because I'd been wanting to try combining fabric and a paper card using spray adhesive. I wasn't sure how it would go, but as you can see here the end result is pretty sweet. I used the new pinking shears I received from the Easter Bunny to trim up two pieces of fabric (leftover from Virginia's quilt!). Then starting with the larger piece, I sprayed the back of it with adhesive and applied it to the center of the card. I repeated with the smaller piece and allowed them to dry. I considered sewing a border but I decided to leave it plain and adorn the center with a vintage lace pin I'd made using this tutorial from Martha Stewart (I did it by hand, but the steps are essentially the same). I figured that with all of the presents Tracy was going to open for the new little one, she should have something just for her!

I didn't have an envelope so I wrapped the card in another fabric scrap and tied it with a pretty length of ribbon. I love that this was so simple to make but it really gave a personal touch to the rest of the gift my mom and I put together for the new mom (and dad) to be.

And, I can't leave you today without sharing my new business cards!!! I have never had my own calling cards and I decided that I need to have them to give out whenever meet someone who I'd like to introduce to my blog. They are in my favorite color combination of pink and gray from the very talented Michelle Brusegaard (remember her inspired image a few weeks back?). She was a joy to work with and I can't wait to start handing these out! (Sorry for the poor quality of this picture...I was having a little trouble with my camera yesterday.)


Friday, April 17, 2009

Inspired Image: Kathleen of Twig & Thistle


Hello, my name is
Kathleen Kennelly Ullman

You can find me at Twig & Thistle and Twig & Thistle Etsy Shop

This image comes from Growin' Up's Flickr Set (found via apartmenttherapy.com) This piece was done by Sam Spencer, an art student of Goldsmiths College in London. He was commissioned to create a piece inspired by the color yellow.

It inspires me because the yellow of the umbrellas seems so utterly optimistic and cheerful! I live in Seattle where an umbrella is part of your wardrobe and a bright yellow umbrella would just make the rain seem so much less gloomy and foreboding.

I particularly love the scale! I wish that I could visit it in person because I imagine that it would be that much more dramatic.

It makes me feel a sense of reassurance and cheerfulness just looking at this image! I could probably look at it each morning and be inspired by it's loveliness!

The 3 words it conjures up are bright, happy, alive.


I just love Twig & Thistle, which if you aren't familiar is a blog that calls itself "a collection of daily inspiration for home and life" which it completely is. Plus, aesthetically, it's really calm and soothing, which to me makes it even more inspirational. (Also, incidentally, the background pattern on the site is very similar to a fabric that I'm currently quilting, so it's feels very familiar!) I'm also very enamored with the items in Kathleen's etsy shop. Check these out!

Li'l Tweet Stitch Kit: the sweetest kit to sew a pink owl as a baby shower gift, a cute keepsake, or just a nice gift for a friend who likes to sew (like me!)
**I announced the winner of the EllynAnne Geisel books on Wednesday and I haven't heard you Carol. So, I hope to hear from you by Sunday night, but after that I need to go to the next winner in line. Fingers crossed! (If you miss the window and email me after, I promise to send you a surprise gift!).

Okay everyone, thanks for reading this week and enjoy the weekend. The forecast is calling for a sunny 75 degrees here in the city tomorrow. To which I say, HOORAY SPRING!!!!

Thursday, April 16, 2009

April Print of the Month


The anticipation I feel for spring is summed up by this month's purchase (and last month's!) that I found by way of Jen's lovely blog the haystack needle. This image called Breathing Space is from etsy seller Peonies and Polaroids and it just makes me take a big, deep, lung-filling breath. Which is very helpful since I have a bit of a tendency to forget to relax as much as I should. I picked up a few frames on clearance at a craft store over the weekend and I'm planning to hang this image up just as soon as it arrives.

Wednesday, April 15, 2009

And the winner is...

Carol! Congratulations Carol, you're the random winner of three fantastic books from EllynAnne Geisel. If you email me at thingswemake [at] gmail [dot] com with your full name and address we'll get the books sent right out to you. Thank you to everyone who entered the giveaway and shared your apron memories. They were so delightful to read. Here's what Carol said:

"My grandmother used to make aprons. For her, for my mom, for me... We had special aprons for cooking and special aprons for sewing. Normally they were made out of old summer dresses or my grandfather's worn out shirts. I found the green apron she made for me in my last trip to Spain. Now, it seemed smaller, but somehow, even bigger in love. I sewed my first apron, in my favorite colors, as a way to tell her how much she meant to me. That apron, has traveled back to America, close to me, close to my heart."

Mom's Quilt Update #2

Here is the recent progress I've made on my traveling quilt project- and since I was in the car for a few hours this past Saturday, we have two full rows done!

I'm really enjoying how the fabrics are working together and that the pieces are thin because I know that eventually, when I quilt around each rectangle, the result will be heavily quilted. And I like that. I'd gotten some new gray thread last week that's specifically meant for hand quilting since it has a thin coat of wax. This has turned out to be a life saver since I didn't realize the one I was using was actually meant for a machine. Which is why I kept getting little knots. Which was incredibly frustrating.
This is my view in the car using my jeans to hold pins. What you don't see is that I had all of my pieces spread out next to me, but luckily I had a whole row to myself so I don't think anyone minded. I was with my mom while I was doing this and it was really fun to keep showing it to her because this way she is seeing the steps involved and will likely remember the days we spent together when I was working on it.

I'm going to post the winner of the EllynAnne Geisel books momentarily, so stay tuned!!

Tuesday, April 14, 2009

Instant Heirloom: Julie Floersch

I saw the work of Julie Floersch a few months ago on Love Forever and was amazed—both with the designs she uses in her quilts and also that she uses denim. I love the texture and the color variations but as a quilter myself, I can only imagine how challenging that fabric must be. More than the designs though, what attracted to me about her work is that she says that "though my critical approach is forward thinking, a traditional and historic aspect still remains through the use of natural materials and an insistence on age old hand craft". Which means that she's very aware and committed to maintaining a connection with the history of her craft as she pushes it to thoroughly modern places. I love that.


image from jan & aya
image from Love Forever

image from Julie's website


image from jan & aya

Check out this great interview on Julie from New York Magazine and also this one from Brooklyn store jan & aya which recently featured her work.

I'd love to hear from you if you are a crafter who keeps an eye on the past. Did you learn from a relative and try to keep those techniques alive? Is there a certain style you try to incorporate into your work? Or if you're not a crafter, I'm curious if you've become more aware of this as the handmade movement has gathered steam. Drop me a line at thingswemake [at] gmail [dot] com or post a comment. And thanks!

Monday, April 13, 2009

Weekend Project: Homemade Tagliatelle

What you see above is the delicious result of a few hours in the kitchen yesterday-tagliatelle with basil pesto. After learning how to make fresh egg pasta last summer on vacation at an organic cooking school in Tuscany (yes, I was that lucky!), I've resolved to make pasta at least once a year. My great grandparents, particularly my Pop-pop Andy, used to make "homemades" regularly and it makes me happy to carry on the tradition. This was the second time I made them on my own and I am SO happy to report that they turned out far better than the first time. I had no problems what-so-ever and I really feel like I understand what the dough is supposed to feel like when it's ready to rest (which happens, for me, after about 12 minutes of kneading). It didn't stick together, it cooked to a perfect al dente and I was very proud of my contribution to Easter dinner. Here's a little peak at my process.

I made two batches, so this is the first one. Ingredients in the pasta were about 400 grams of semolina flour and 4 eggs. I used a fork to break up the eggs and whisk them together, gradually pulling in the flour. Once it was together enough, I started mixing it with my hands until it formed a ball that I could knead.
I'm pretty sure this is exactly what my Grandmom Theresa's hand looked like when she was kneading and I now totally understand why she had such strong forearm! It's very hard work, but I've gotten the hang of the mechanics so I let the soothing nature of the repetition take over and distract me from the hard work.


Here are the happy dough balls resting. After kneading each until the dough was elastic and smooth, I let them rest for 15-30 minutes, lightly covered with a towel. (One good way to tell if they have been kneaded enough is to push your finger into the dough. If a slight indentation remains and slowly bounces back, it's ready.)


After resting, I cut one ball in half and used a rolling pin to start rolling out the dough. Once it's thin enough, I start passing it through the pasta machine. This picture is after about two more times through the machine. One of the things that I had trouble with the first time I made pasta at home was that it got two thin because instead of relying on the feel of the dough, I followed the recipe exactly. With our pasta machine, I go to the second to last setting before cutting, #4, (the recipe says to go to the next to last which would be #5). This adjustment made a huge difference.


Here you can see me passing a piece of dough through the machine. Each time you put a piece through it needs to rest for a minute or two, which allows for a nice slow and steady pace.


I covered our dining room table with a cotton table cloth and laid out all of the pasta to dry for about 2 hours. It was all carefully straightened so that none of the pieces were touching (which would make them stick together) so this picture is as I was gathering them up to put into boiling water. It cooks fast and only takes 2-3 minutes. I love the texture of this type of pasta and am thining that if I only made one batch at a time, I could do this on a more regular basis. If I get my own pasta machine that is!
And here below is the other food highlight of the weekend at home with my parents, my sister Katie and her hubby Dave and my Aunt Chrissy.

Ricotta pie! My mom went all out and made a lattice top to the pie, which she told us she used to do when we were little. It was a great touch because it means that there was more crust with each slice, which in my book is always a plus, especially when you are eating pie for breakfast as we always do on Easter. I'm looking forward to enjoying leftover slices for the next day or two!